Replacing the BS170 in an Ultimate3S Beacon

The new BS170 in its socket
After the weather zapped the output transistor (a BS150 FET) of my Ultimate3S beacon from QRP-Labs yet again, I was forced to replace the device, again. It is not a difficult job at all, just a little chore. This time I decided to make it easier on myself. Instead of replacing the transistor by soldering it in, I decided to use a plug-in base so that I can just whip it out and plug in a new one.

The bad guy
The offending object is shown clearly out of focus, just to gain some perspective. I always solder mine in with at least 5mm long legs sticking out above the PC Board to allow for fitting a heat sink.

Decapitated
Decapitate the weakling in one go! Don’t waste time, just stick in the cutter and cut out the weakling, but do it as far away from the PCB as possible, leaving the stumps for later removal. I placed a small piece of paper behind the legs to make it easier to see in the picture.
Now you can just heat the legs one-by-one and tap the board so the legs will drop out. Easy.

IC Sockets
Next, consult your trusty junk box or buy some of these IC sockets. They can be any number of pins from 8 to 28, it doesn’t matter. I just happened to have 8-pin variants in stock. Avoid the cheap ones with the single flat blades that pushes to one side of the IC only.
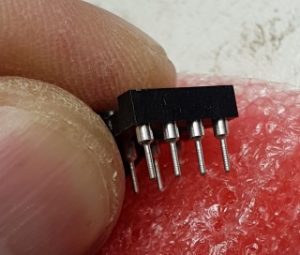
Cylindrical pins
This is what you want. These cylindrical (or tubular) legs will make good contact with the FET’s legs and they are tapered and coated so your connection is guaranteed to be solid.

Three Pins
Solder three pillars into the three required holes. I managed to keep the front two pillars together and the back pillar is separate due to space constraints. You might even put a drop of glue to hold everything together, but that isn’t necessary and I didn’t do it.

In Place
Cut the FET legs a little bit shorter, but not too short, and plug it into the sockets. Make sure it goes down all the way and is oriented correctly.
You can see a close-up view of FET in position at the start of this article.

Completed
Admire your work upside-down and from the side, making sure everything fits correctly.
Put back your heat sink, close the covers and away you go!
Next time, replacing the BS170 will be a cinch.
![]()