Category: My Operating

  • Replacing the BS170 in an Ultimate3S Beacon

    The new BS170 in its socket
    The new BS170 in its socket

    After the weather zapped the output transistor (a BS150 FET) of my Ultimate3S beacon from QRP-Labs yet again, I was forced to replace the device, again. It is not a difficult job at all, just a little chore. This time I decided to make it easier on myself. Instead of replacing the transistor by soldering it in, I decided to use a plug-in base so that I can just whip it out and plug in a new one.


    The bad guy
    The bad guy

    The offending object is shown clearly out of focus, just to gain some perspective. I always solder mine in with at least 5mm long legs sticking out above the PC Board to allow for fitting a heat sink.


    Decapitated
    Decapitated

    Decapitate the weakling in one go! Don’t waste time, just stick in the cutter and cut out the weakling, but do it as far away from the PCB as possible, leaving the stumps for later removal. I placed a small piece of paper behind the legs to make it easier to see in the picture.

    Now you can just heat the legs one-by-one and tap the board so the legs will drop out. Easy.


    IC Sockets
    IC Sockets

    Next, consult your trusty junk box or buy some of these IC sockets. They can be any number of pins from 8 to 28, it doesn’t matter. I just happened to have 8-pin variants in stock. Avoid the cheap ones with the single flat blades that pushes to one side of the IC only.
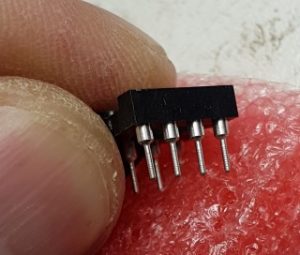


    Cylindrical pins
    Cylindrical pins

    This is what you want. These cylindrical (or tubular) legs will make good contact with the FET’s legs and they are tapered and coated so your connection is guaranteed to be solid.


    Three Pins
    Three Pins

    Solder three pillars into the three required holes. I managed to keep the front two pillars together and the back pillar is separate due to space constraints. You might even put a drop of glue to hold everything together, but that isn’t necessary and I didn’t do it.


    In Place
    In Place

    Cut the FET legs a little bit shorter, but not too short, and plug it into the sockets. Make sure it goes down all the way and is oriented correctly.


    You can see a close-up view of FET in position at the start of this article.

    Completed
    Completed

    Admire your work upside-down and from the side, making sure everything fits correctly.

    Put back your heat sink, close the covers and away you go!

    Next time, replacing the BS170 will be a cinch.

  • Ultimate 3 S – part 2 – drifting a bit

    U3s WSPR drifting
    U3s WSPR drifting

    I let the U3s run last night with the first LPF relay board installed (6 bands only) and hopping in sequence from 80m to 10m just to see what can happen. I’m still learning the device, she is not a trivial little kit! I added a CW ID as the last transmission.

    Anyways to my surprise two major discoveries: The single output transistor is not overheating – thats gotta be good. And then some spotters uploaded my callsign! This is amazing because the bands were a little bad. To see my signal going as far as 8000km on only 200mW (I didn’t actually measure the 200mW, I’m just assuming) is a great accomplishment.

    The little worry is that it appears to drift a little on 10m, only 3 Hz or so, but still … I wanted to put up a 2m beacon sometime and the drift is not good. Mind you, I haven’t done anything to stop it, there are some hint’s on Hans Summers’ blog site.

    Meanwhile, maybe it is time to build the OCXO (Oven Controlled Crystal Oscillator) and see if that brings an improvement.

  • Ultimate 3 S – part 1

    Ultimate 3 S
    Ultimate 3 S

    My latest baby! I will write the full story in a few installments, from the back to the front so to speak, in other words I’ll show you the final result first before going back and showing pictures of the construction and so on.

    Of course I’m talking about my Hans Summers Ultimate 3S beacon transmitter.

    She came to me via the UK, where Ken Murdoch put it into his luggage and transported it to me in the far south over the December 2015 holiday period. Thus we avoided any issues with the South African Post Office who is notorious for “losing” packages.

    After some construction time, not a lot I might add, she lit up her lights and started WSPR-ing sweet tones to the world. ZS6USA was the first to respond.

    It is possibly the best kit I’ve ever built and the sweetest performer I can remember.

    Watch out for part two.

  • WSPRing is addictive

    WSPR on 2m
    WSPR on 2m
    Like the mermaid calling the sailor, this mode called WSPR seems to be calling me back every time. Circumstances pushed me out of the house into my new outside semi-underground shack which made me QRT for a while while I was painting and renovating, but the first thing I did (after making the few compulsary voice contacts on 40m) was to set up my WSPR station again.

    But this time it came with a different urgency. After getting the basics right and decoding a few stations on 10m (wow the bands are lively!) I tried 6m. My antenna isn’t very good but what the heck the Flex-1500 can go there. No decodes. Can it go higher? Nope, that is the highest frequency the Flex will do.

    Thus out comes the old trusty Yaesu FT-857D, still a remarkable and reliable radio after so many years, a true benchmark model to compare against. The G4ZLP modem is also the best money I ever spent for first-time-lucky set-ups. But oh dear, nobody on 6m (lots on 10m), so we tune up to 2 meters on a nice vertical. Still no decides, sigh. After reading a bit more, it seems like not a lot of people are WSPRing on 2m and so I posted in the SARL forum as well for some help. Tropo ducting is rife at the coast and my always-opportunistic self decides to make 2m a priority.

    As of this morning my station is QRV on 144.489MHz (dial setting) and I’m in and out of the shack doing chores while thinking about the next step. I’m going to have to wake-up shake-up some rusty old hams to participate otherwise I’ll get no spots. I’ll keep you posted.

    P.S. the upshot of this all is that I spoke to the minister of home affairs about how far we can bend the budget and she agreed that we have enough to buy one of Hans Summers’ Ultimate U3S QRP kits. I’m so excited I can eat raw popcorn!

  • Falklands is a mere WSPR away

    WSPR to Falklands
    WSPR to Falklands

    The last thing I did last night was to make peace between my laptop, my Flex-1500 SDR, and the various VAC and VSP drivers and whatever else was struggling to co-exist in the apparently too small memory of my Windows 7 computer.

    So can you imagine the delightful surprise I got this morning: I switched everything on and went to make coffee and shower. A little bit later I went to check on my WSPR installation, and this is what I saw on the log:

    2015-06-08 05:12 VP8ALJ 3.594094 -19 0 GD18bh 10 ZR6LU KG43 7517 105

    I’m very pleased, because my antenna is not really made for 80m (it’s actually a 40m travelling wave Broadgun) and I wasn’t expecting any spots yet. But there it is, and more than once. Nice spot!

    This is what makes this hobby so great, these little achievements.

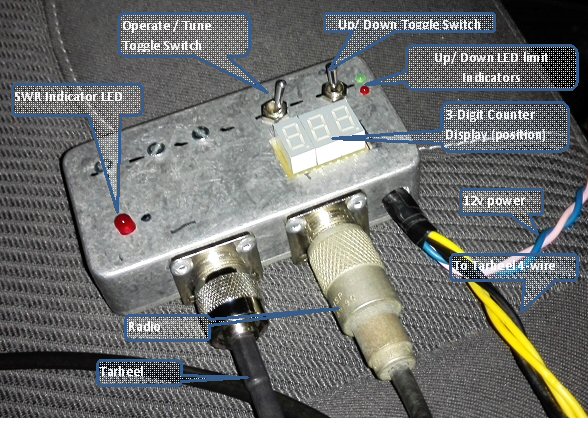
  • Tarheel Antenna Controller

    Tarheel Screwdriver AntennaController
    Tarheel Antenna Controller
    I have lately been taking some family holidays at the coast and this presented me with the ideal opportunity to play with portable and/or mobile antennas.

    Initially I used a standard 108″ whip antenna, tuned with a tuner. I bolted it to my towbar with a custom bracket. It kind-of works but deep inside I had the feeling I should try something else.

    Then I played with an Alpha Moto Mobile Antenna (all-bander) that I purchased from Ivan Marks in Cape Town, together with a Alpha Stainless Steel Quick Release Jaw Clamp Mount. The jaw clamp is awesome and will stay in my toolbox. The antenna worked well from 20/15/10 but it was – as can be expected – a few points down on 40m. Interesting antenna though.

    But eventually I scraped together enough money to lay out for a Little Tarheel II from Sams Radio Accessories. It was both very expensive, and a complete and utter technical surprise at the same time. While I still think I paid far too much for a simple antenna (cough-cough), it is the design and installation that is most intriguing.

    Firstly, I was wrong. I did not understand how a screwdriver antenna works, and I’m not talking about the engineering. I nearly added another G to the purchase to buy a controller. Boy, was I lucky that the item wasn’t in stock! See, the issue is that the Tarheel doesn’t need a tuner – it is for all practical purposes a tuner in itself. Nobody tells you that when they talk about the antenna.

    What is very useful though is a watt-meter or a SWR-meter, and maybe a turns-counter. So after using the antenna for a few days I started checking the possibilities and I built a prototype of a combination box with:

    1. Up / Down switch (to replace the factory-supplied one)
    2. SWR Bridge / meter / indicator
    3. Counter (counts how much of the coil sticks out)

    It is working very well and I will make more details available as I find time to make drawings and test and improve the design.

  • Mobile in Hibberdene KF59gk

    Hibberdene KF59gk 11 Oct 2014a
    Hibberdene KF59gk 11 Oct 2014a
    I had the privilege to go on holiday for a few days to the coast, staying in a lovely woodenframe cottage with my dogs for 4 days. My wife allowed me to pack a small radio, and so on the Saturday I managed to catch a few contacts with my new/old (that’s another story!) IC-703, from the balcony of the cottage overlooking the Indian Ocean in Hibberdene Grid Square KF59gk, kindly rented from Walter and Louise, Hibberdene Escape. They come highly recommended.

    Initially I called ZS5GS and Gerald came booking back 59+ and gave me a 55, with which I was very happy because I was using a short ICOM AH-703 antenna, a portable multibander with a total length of 1.4 meters (4.6 ft)! Incredible performance for such a small device. I also had a similar report back from Johan ZS6AF.

    Thanks guys, you made my day! 73s.

  • Getting my Yaesu FT-857D on the new 60 meter bands

    5MHz on FT-857
    5MHz on FT-857
    I purchased my Yaesu FT-857 a few years ago, way way before the new 5MHz (60 meter) allocation was available to hams, so it wasn’t a consideration then.

    However things have changed and last weekend the SARL organised a whole weekend’s worth of playing on the new frequencies. Oh what is a man to do when you don’t have toys!

    A quick search on Google revealed that there is a MARS mod for the FT-857D, which allows it to transmit on the 5MHz band. I’m not going to repeat all the details here but you should find the following links useful: KU4BY’s MARS mod, Jumper Sheet, Danplanet’s version, and of course Allan Kissack to mention a few.

    In summary, I opened my case, unsoldered and re-soldered the jumpers as advised, reset the radio on poweron, and everything was working as expected.

    A reminder that you will lose your original memory settings, so if you have a lot of memories stored you should back them up first. I don’t use memory channels so it wasn’t a challenge for me, but I tested the free “CHIRP” program and it worked perfectly.

    As always, you are on your own if your actions causes damage, I’m merely relating what worked for me.

  • A Buyers Guide to the FT-817ND and X1M

    Why?
    Why?
    So, you want to know about my X1M? Why I bought it? Actually, I wish I could tell you any bad news, and yes there are some annoyances, but generally speaking for the price I paid I have a very good radio. Do you mind if I tell you some background?

    I have a Yaesu FT-857D as my all-time favourite radio, I use it as much as possible for voice and for experimenting, and when I need a bit of power I have a solid state HF amplifier that I can add to take the nominal 100 watts up to 600 watts or so – but that doesn’t happen very often. I am very happy with the FT-857D, and it gives me 6m/50MHz access when I want to.

    But then I realised I was always having to fiddle with the knobs and settings when I swopped to digital (things like mic gain and compression), and so I decided to buy a second radio that I could dedicate to digital. I found a good second-hand FT-840 and set it up permanently for digital, my favourite mode is PSK31/64/128 with RTTY not far behind. I use HRD, the free version (v5.28) on my laptop. The radio doesn’t do 6 meters but that is not a big issue for me yet. And it has adjustable mic gain with ALC indication, so slowly I started using less and less power to have a cleaner output (less IMD).

    So, with my radios nicely set up at home, I needed something for when I was travelling. I identified my choices as either another Yaesu (817) or
    something else. The price of a new FT-817ND is very expensive, and around that time the local supplier started advertising that he had some Xiego X1M’s in stock at an attractive price point more or less a third of the price of a new Yaesu. Using the old saying “You get what you pay for” I immediately started comparing the two radios, and with other radios, to find out what I was losing by buying the cheaper radio.

    At this stage I must admit that I really looked at competitive radios from all angles, and I included multi-banders like the Elecraft or
    single-banders like the MFJ-9410/9420. I even drooled over a SDR radio, the SoftRock RXTX Ensemble Transceiver Kit. All of those options were very good in one way or another, but none were complete multiband radios (I like jumping bands to follow conditions). Some radios were too expensive, some were too restrictive (I don’t do CW, I only do voice and digital).

    In fact, it soon became clear that the X1M was an excellent combination of features at a very attractive price. I will give you my summary of comparisons between the FT-817ND and X1M as follows:

    X1M Pro: Cost about one third, runs off 12v wall adapter, has all traditional HF bands, is a complete solution, very easy to operate. Nice package.
    FT-817 Pro: Added filtering, DSP, added WARC bands and 6m, very mature menu system.
    X1M Con: no DSP, no AGC, no S-meter. Somewhat “basic” circuit (that is a subjective judgement), no WARC bands filtering (although you can listen)
    FT-817 Con: Expensive.

    Thus I decided to give the X1M a go and sent my money. A day later I had my radio, and I’ve been very happy about my purchase so far. I am not blind to the fact that I did not get the full package of features. The AGC is an issue, and the DSP is an issue. For the rest it is pretty good radio that has given me many hours of nice working, SSB as well as digital.

    Specifically you are asking about the drifting. Now I didn’t do any specific measurements on WSPR, but I did check out my signal reports and other sources, and it seems stable enough. I warm up the radio anyway, and if it transmits a lot the case gets warm, but I have no idea if that has any influence on the performance. Depending on conditions and the band I can get 20 – 60 hits per day, all without complaints or comments.

    The X1M is an “easy” radio to open and work on, but do remember it contains three rows of connectors with 0.5mm spacing that you have to push in very carefully. Having said that, I have opened mine several times to trace the location of some components, and as long as I am careful it seems to work every time I put it together. I also made a custom cable for my interface (G4ZLP DigiMaster Pro3) that goes into the speaker/mic sockets.

    I hope this helps, but please do not hesitate to ask if you need more information.

  • WSPR is open on 10 meters

    WSPR 445pm UTC 10jan2014
    WSPR 445pm UTC 10jan2014

    I am as excited as a child in a toy shop! My favourite band is 10 meters and on my recently set-up WSPR station I am hitting anywhere from 5 to 9 stations across the grayline. That is the coolest thing!

    My station is as follows:

    • Radio: A Chinese Xiego X1M Platinum (puts out 5 watts nominally on CW) (Oh, and it runs off a 1 Amp wall-adapter). Currently unmodified although I am waiting for parts to do the AGC mod.
    • Modem: G4ZLP DigiMaster Pro3 (awesome piece of kit!). I had to make an interface cable which was easy. I’ve set the transmit volume to out out a clean signal on the X1M at about 1 watt, not the boisterous 5 watts it normally pouts out, to make sure I don’t have interference.
    • Tuner: MFJ-941E (a really cool tuner that doesn’t use any power and has become one of my trusted tools.
    • Antenna: One of two: Usually I just leave the radio on the multiband travelling wave (commercially a Broadgun) which, because of my QTH setup, works reasonably well and I don’t have to unplug at the slightest warning sign of weather. My favourite antenna is my horizontal loop, just 83 meters of wire strung between the trees. It is quiet and gets out very well.

    At the moment I’m just collecting call signs but soon I will want to investigate the legitimacy of sending a SWL (or even a QSL) card for, let’s say a two-way contact within 30 minutes. Hmmm … might be politically incorrect? We will see.

    Meanwhile enjoy WSPRing.