5MHz on FT-857I purchased my Yaesu FT-857 a few years ago, way way before the new 5MHz (60 meter) allocation was available to hams, so it wasn’t a consideration then.
However things have changed and last weekend the SARL organised a whole weekend’s worth of playing on the new frequencies. Oh what is a man to do when you don’t have toys!
A quick search on Google revealed that there is a MARS mod for the FT-857D, which allows it to transmit on the 5MHz band. I’m not going to repeat all the details here but you should find the following links useful: KU4BY’s MARS mod, Jumper Sheet, Danplanet’s version, and of course Allan Kissack to mention a few.
In summary, I opened my case, unsoldered and re-soldered the jumpers as advised, reset the radio on poweron, and everything was working as expected.
A reminder that you will lose your original memory settings, so if you have a lot of memories stored you should back them up first. I don’t use memory channels so it wasn’t a challenge for me, but I tested the free “CHIRP” program and it worked perfectly.
As always, you are on your own if your actions causes damage, I’m merely relating what worked for me.
Yaesu FT-726RTired of struggling with pressing buttons on the new radios to get to deeply embedded menu systems even if you want to change a simple thing like Clarify? And, well, forget about working cross-band satelite! Well, the Yaesu FT-726R VHF/UHF Amateur Transceiver must be the last and ultimate all-mode VHF/UHF radio for afficinados who prefer a large front panel with lots of buttons.
This Yaesu FT-726R is a tri-band, multi-mode transceiver and comes with 2 meters, 6 meters and 70 cms modules installed. It also has the Satellite Unit installed and has a place for the tone board. The radio features a digital display, dual analog meters carry handle and 11 memories. Most controls are on the front panel and it features 220v or 12 volt operation. The rear panel has three antenna jacks in addition to the other regular I/O jacks. I will include a printed copy of the Owner’s Manual and a high quality condenser YM-48 hand mic.
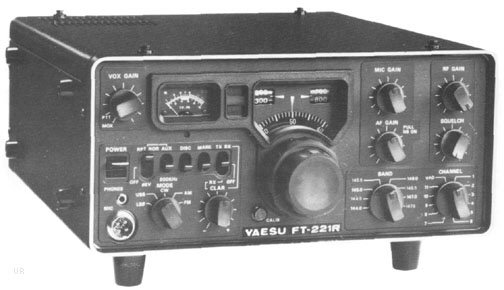
Yaesu FT-221RYaesu FT-221R-openI fell in love with this baby immediately – it has every mode a ham can ask for, and if you lift the top cover you can reach every adjustment you want to make. She is a classic, manufactured during the late 1970’s when everything was tidy and used a computer back-plane with plug-in modules. It even has the original quirky 4-pin square power connector that is impossible to find nowadays. Runs off a built-in 220v power supply or you can use the 12v input. Unfortunately I already have two other VHF radios and the XYL is beginning to complain about the invasion of radio equipment, so she has to go.
The Yaesu FT-221R is a 2 meter multi-mode transceiver that operates in SSB, CW, FM and AM modes. Power output is: SSB 12 watts PEP, CW 14 watts, FM 14 watts and AM 2.5 watts. Frequency coverage is 144 to 148 MHz in eight 500 kHz ranges. It has a built-in 100 kHz crystal calibrator, noise blanker, speaker and three way analog meter (S Meter/Power Out/FM Discriminator) according to Universal Radio. There is no 88.5Hz tone board fitted so you can’t access CTCSS repeaters, but it already has the plug fitted for tone output on the back and you can easily fit one of the boards supplied by Magalies Club – I wrote about that earlier. You can also read the eHam reviews here and of course RigPix also has a picture here.
She comes complete with power cord, microphone and two printed manuals. I don’t have proper test equipment to check her out completely, but I switched her on and I was able to record a few seconds from the Sandton repeater (145.700 FM) which you can listen to on my Downloads page. You can also download the user guide from there if you can’t find one on the internet.
Why?So, you want to know about my X1M? Why I bought it? Actually, I wish I could tell you any bad news, and yes there are some annoyances, but generally speaking for the price I paid I have a very good radio. Do you mind if I tell you some background?
I have a Yaesu FT-857D as my all-time favourite radio, I use it as much as possible for voice and for experimenting, and when I need a bit of power I have a solid state HF amplifier that I can add to take the nominal 100 watts up to 600 watts or so – but that doesn’t happen very often. I am very happy with the FT-857D, and it gives me 6m/50MHz access when I want to.
But then I realised I was always having to fiddle with the knobs and settings when I swopped to digital (things like mic gain and compression), and so I decided to buy a second radio that I could dedicate to digital. I found a good second-hand FT-840 and set it up permanently for digital, my favourite mode is PSK31/64/128 with RTTY not far behind. I use HRD, the free version (v5.28) on my laptop. The radio doesn’t do 6 meters but that is not a big issue for me yet. And it has adjustable mic gain with ALC indication, so slowly I started using less and less power to have a cleaner output (less IMD).
So, with my radios nicely set up at home, I needed something for when I was travelling. I identified my choices as either another Yaesu (817) or
something else. The price of a new FT-817ND is very expensive, and around that time the local supplier started advertising that he had some Xiego X1M’s in stock at an attractive price point more or less a third of the price of a new Yaesu. Using the old saying “You get what you pay for” I immediately started comparing the two radios, and with other radios, to find out what I was losing by buying the cheaper radio.
At this stage I must admit that I really looked at competitive radios from all angles, and I included multi-banders like the Elecraft or
single-banders like the MFJ-9410/9420. I even drooled over a SDR radio, the SoftRock RXTX Ensemble Transceiver Kit. All of those options were very good in one way or another, but none were complete multiband radios (I like jumping bands to follow conditions). Some radios were too expensive, some were too restrictive (I don’t do CW, I only do voice and digital).
In fact, it soon became clear that the X1M was an excellent combination of features at a very attractive price. I will give you my summary of comparisons between the FT-817ND and X1M as follows:
X1M Pro: Cost about one third, runs off 12v wall adapter, has all traditional HF bands, is a complete solution, very easy to operate. Nice package. FT-817 Pro: Added filtering, DSP, added WARC bands and 6m, very mature menu system. X1M Con: no DSP, no AGC, no S-meter. Somewhat “basic” circuit (that is a subjective judgement), no WARC bands filtering (although you can listen) FT-817 Con: Expensive.
Thus I decided to give the X1M a go and sent my money. A day later I had my radio, and I’ve been very happy about my purchase so far. I am not blind to the fact that I did not get the full package of features. The AGC is an issue, and the DSP is an issue. For the rest it is pretty good radio that has given me many hours of nice working, SSB as well as digital.
Specifically you are asking about the drifting. Now I didn’t do any specific measurements on WSPR, but I did check out my signal reports and other sources, and it seems stable enough. I warm up the radio anyway, and if it transmits a lot the case gets warm, but I have no idea if that has any influence on the performance. Depending on conditions and the band I can get 20 – 60 hits per day, all without complaints or comments.
The X1M is an “easy” radio to open and work on, but do remember it contains three rows of connectors with 0.5mm spacing that you have to push in very carefully. Having said that, I have opened mine several times to trace the location of some components, and as long as I am careful it seems to work every time I put it together. I also made a custom cable for my interface (G4ZLP DigiMaster Pro3) that goes into the speaker/mic sockets.
I hope this helps, but please do not hesitate to ask if you need more information.
Weather StationWhat a nice picture of a weather station – but it is not mine. My little guy is a La Crosse WX-2315 that I picked for relatively cheap and it has been running on my Windows XP laptop for a few weeks, using WUHU. It works well.
But, being the inquisitive kind, I decided I wanted to try my hand at the Raspberry Pi. I’m comfortable with linux but not an expert. WUHU didn’t seem like an option on the Raspberry Pi and Debian, but I came across the python-based Debian package called “weewx” that looked interesting. And further reading pointed me to the website of Chris Davies-Barnard which helped me a lot. I think I encountered one or two typos on his website which were obvious enough, but for the rest it was logical and clear and took me all the way to a working installation.
What I like about this setup is that I am now low-power, whereas previously I had to keep the laptop powered up. I haven’t had to restart the whole circus and see that it comes up correctly after a power failure or unintended shutdown but that will have to wait for later.
I am as excited as a child in a toy shop! My favourite band is 10 meters and on my recently set-up WSPR station I am hitting anywhere from 5 to 9 stations across the grayline. That is the coolest thing!
My station is as follows:
Radio: A Chinese Xiego X1M Platinum (puts out 5 watts nominally on CW) (Oh, and it runs off a 1 Amp wall-adapter). Currently unmodified although I am waiting for parts to do the AGC mod.
Modem: G4ZLP DigiMaster Pro3 (awesome piece of kit!). I had to make an interface cable which was easy. I’ve set the transmit volume to out out a clean signal on the X1M at about 1 watt, not the boisterous 5 watts it normally pouts out, to make sure I don’t have interference.
Tuner: MFJ-941E (a really cool tuner that doesn’t use any power and has become one of my trusted tools.
Antenna: One of two: Usually I just leave the radio on the multiband travelling wave (commercially a Broadgun) which, because of my QTH setup, works reasonably well and I don’t have to unplug at the slightest warning sign of weather. My favourite antenna is my horizontal loop, just 83 meters of wire strung between the trees. It is quiet and gets out very well.
At the moment I’m just collecting call signs but soon I will want to investigate the legitimacy of sending a SWL (or even a QSL) card for, let’s say a two-way contact within 30 minutes. Hmmm … might be politically incorrect? We will see.
X1M Digimaster ComboInterfacing a Xiegu X1M 5 watt QRP HF transceiver to a G4ZLP Digimaster Pro3 to go digital and portable on the HF bands, by Leon Uys ZR6LU.
I recently obtained a Xiego X1M HF radio from OM Rory in Port Elizabeth. Nice package and works SSB out of the box. I took it with me to Parys on a weekend (it was small enough to sneak it into my baggage without the XYL noticing) and working off a 12v/7Ah gelcel battery I managed a few contacts by stringing a piece of wire into a nearby tree. Signal reports were around 57, not surprising as it only puts out 5 watts. Reception was ok but I was slightly bothered by the background noise especially on 40m and I had no way to filter it out or reduce it (see more later).
Remember I was calling QRP or Portable, as I was deliberately working off-grid. I wanted to be able to pack my stuff into a small backpack and carry it with me – not quite RaDAR, yet, but certainly testing the limits of what can be achieved in a light weight package. Thus, getting a 57 report was actually a compliment to me.
To put things in perspective, the X1M is more-or-less a competitor to the Yaesu FT-817. I should say less, because it is a lot cheaper but it also lacks a lot of very nice, often essential features. Like DSP audio filtering. More about that later. But overall you get what you pay for and I am satisfied that it works as advertised.
So my next challenge was to get on the air with digital. My ultimate goal is to work PSK31 off a small 12v battery to some exotic island! I have no idea if that is even achievable but I’m certainly going to test the waters!
Working digital is not strange to me, as I have a permanent station set up at my home QTH. I have two home-built modems that give excellent results, and my Yaesu FT-840 is permanently connected to a Broadgun Travelling Wave antenna (multi-band) about 10 meters above ground. Pushing about 50 watts before the ALC kicks in, I have worked most continents and I’m chasing a DXCC since September 2013. I use my other radio, a Yaesu FT-857 with a 400 watt linear when needed, more for voice but it is also occasionally roped in for PSK use. My logging is done with Ham Radio Deluxe and DM870. Easy and comfortable.
So question 1: Which interface? Scouring the internet I see the Tigertronics SignaLink gets the thumbs-up from many people. Importing into South Africa is technically easy but very expensive in local currency. More so because the Post Office service is non-existent and we have to use couriers which can easily double the actual dollar cost of an interface. But hey, if it is good enough for other hams, it is good enough for me, right?
Wrong! The SignaLink was a big disappointment. Oh, it is an excellent sound card interface, and I have kept mine after playing with it. It works. But it doesn’t have a CAT or any form of computer interface! Sadly it is only a sound card interface with no capability to interface to a serial or USB-serial port. And, guess what, if you run HRD with DM870 it is almost essential that you have that capability. Now I could have added yet another converter box to my collection of cables and boxes. I’m already unpacking several transformers and cables and goodies every time I set up station and one more would not be an issue.
G3ZLP Digimaster Pro3But why struggle with fixing things, trying to make them work, when there is an excellent ready-made off-the-shelf solution? Enter the Digimaster ProThree from G4ZLP Electronics: The most awesome (and may I add easiest to set up) interface money can buy today.
Just for the record, my Digimaster Pro3 arrived in-country at Customs within 48 hours after placing my order. It was working in my shack within hours after delivery. And the support was even faster. It is an excellent device.
So now we have the pieces of the puzzle on the table – a 5 watt HF radio, a sound card, a serial port (for easy logging) and lots of enthusiasm, but nothing actually connects together! Since there is no real instruction manual for tying together this odd collection of stuff, my approach was to test each component individually before attempting to create fireworks.
X1M RS232The first test was to add a USB-to-Serial converter between my laptop and the radio. I used a spare Arduino board from my junkbox as a RS-232 to 5v converter (“Xbee USB adapter” link below) and simply wired up the 3 wires with jumpers: Ground, Rx data and Tx data. Set up HRD as an ICOM 718 and wow! Everything works, I can read or change frequencies and bands and it is really exciting.
Next I needed to see if the audio quality from the earphone was usable. This was very quick and easy, I simply used a 3.5mm headphone patch cable to go from the “Headphone” socket on the rear of the X1M radio to the “Microphone” socket on the laptop. Running HRD / DM870 I could see some signals on the waterfall display. Audio should be sufficient.
MFJ-561 CW PaddleNow a short diversion to use my MFJ-561 miniature travel iambic CW paddle to see if the radio can click into CW mode and if a kind of PTT arrangement would be possible. Success again, the X1M works nice on CW. Most of the “Plug-and-Pray” experiments are now done. I think we have a possible winner.
But I want to use a single black box (pun not intended) for interfacing, and so out comes the Users Guide for the G4ZLP Digimaster Pro3. Actually, just the pin connections on page 4 for the 6-pin mini-DIN connector. A quick e-mail to Noel (I told you the support is awesome) to confirm that the CAT interface is already at 5 volt, and the soldering of the two interface cables commence.
This next two steps involve pulling out the soldering iron. Step 1: Make a serial cable.
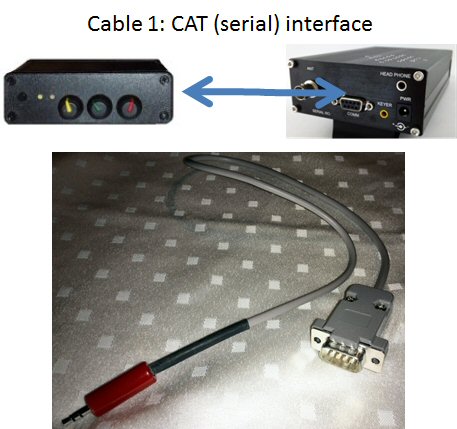
X1M CAT cableA full schematic with pictures is provided in the appendix, but essentially a 3-wire cable is soldered up that links the 3.5mm CAT interface on the Digimaster Pro3 to the 9-pin Serial connector on the back of the X1M transceiver: Ground, Rx data, TX data. I kept my wire short to reduce the possibility of RF interference.
Step 2: Make a sound and PTT cable.
This time around it is a two-header cable: From the 6-pin mini-DIN connector make a short audio cable for the speaker connector on the back of the radio (two wires), and then make a second cable to the front mic connector on the X1M. I am taking the wires through a ferrite bead scavenged from an old Sony camera cable to reduce possible interference.
Fire up the works and you should be ready to go! I found that the volume controls on the Digimaster Pro3 are quite sensitive, and you should follow the general instructions on the G4ZLP site carefully. My PTT is the virtual COM-port and the transmit audio is set for 0dB gain in HRD. I am including screen shots for reference.
I have one concern that I must mention so far: The little X1M radio does not have AGC or DSP, so the audio quality is very noisy from all the pops and crackles and adjacent signals cause interference. Maybe in a follow-up project we can try to do something about that.
Happy PSK’ing! See you on the QRP bands soon.
73s
de Leon Uys ZR6LU
________
References:
1. Xiego X1m Radio http://www.eham.net/reviews/detail/11065
2. Tigertronics SignaLink http://www.tigertronics.com/
3. Digimater Pro3 by G4ZLP Electronics http://www.g4zlp.co.uk/unified/DigiMaster_ProThree.htm
4. Rory ZS2BL SA Ham Shack http://www.commco.co.za/sarl.htm
5. Yahoo! Groups X1M Tranceiver http://groups.yahoo.com/neo/groups/X1M_QRP-Transceiver/conversations/messages
6. RS232-to-USB Serial 5v Adapter http://www.dfrobot.com/index.php?route=product/product&product_id=72#.UsCCo_uupCq
7. MFJ Enterprises, CW Travel Paddle http://www.mfjenterprises.com/Product.php?productid=MFJ-561
X1M PlatinumThe new QRP is here – where the “P” stands for In-My-“Pocket” and not for Low-“Power”. In days gone by one would purchase a Yaesu FT-817, or if you had a few more buckaroos you might consider a pricey Elecraft KX3 if your budget can stretch that far. While they were low-power, they were far from pocket-radios.
Enter the new Chinese players. For less than half the price they produce quite a capable radio, and the best of all is they are setting a new standard for small size. Have a look at the picture – you can actually not believe the size and weight until you hold it in your hand. Yes, the Xiego X1M Platinum is truly a pocket radio. Exactly how small wasn’t apparent until I went to the Post Office to collect my shipment.
Look, the Yaesu and the Elecraft have more functions, more memories, more buttons. The X1M is a basic radio. But it works, and it does exactly what you expect from it. Initially I felt funny holding such a small mic in my hand, it feels like a toy. But once you watch your signal go out clean and clear you start re-thinking your options. My testing was done on a 83m horizontal loop antenna and I called 80/40/20/10 with reasonable results although there was a storm moving in and lots or crashing and thunder noise, so I couldn’t do extensive testing. I will feed back on digital modes testing as well as stability on a portable vertical antenna.
Availability is not great, stock is limited. I’m told the designer is only making a few hundred at a time. I ordered from Rory ZS2BI late one afternoon, and he promptly shipped via courier so two days later I rushed home to play with my new toy. Also, if you want the latest and greatest, don’t buy this version because there will be new versions out before you blink your eyes – a normal situation when new market segments open.
P.S. I couldn’t resist, of course. Just before I switched off for the night, I plugged the X1M antenna coax into my HLA-300+ Linear Amplifier. Just for fun, right. I shouldn’t have – this is a match made in heaven. Key down in CW on 40m it blares out 260 watts effortlessly. It seems like the two of them were having so much fun together.
DigiMaster Pro3The next critical piece in my quest to become completely QRP-Portable arrived on Friday afternoon. No sooner did I arrive home than I ripped open the box, ignored the instructions, and promptly proceeded to connect and use my new sound card and CAT interface – a DigiMaster Pro3 from G4ZLP. Happiness knows no boundaries!
Now to tell the story truthfully I will have to go back in time a little: In fact about 4 months ago on 1st July 2013 I made my first PSK31 contact with a home-built interface (CAT and Sound). Since then I managed to capture about 100 contacts in 30 countries with that interface and radio: A Yaesu FT-840 running 30-50 watts into a Broadgun Travelling Wave wire antenna not more than 10 meters above ground. A major motivator was Noel Hammand ZR6DX who explained the inner workings of HRD at the West Rand Club (www.zr6wr.co.za) and which brought me up to speed in no time. Remember that it was winter by us and the conditions were very poor, so eking out even a modest signal from the ether was tough.
Nevertheless, I built a second interface (different schematic) for my second (mostly voice) radio, a Yaesu FT-857D (CAT and sound). It also worked well and I probably made one or two contacts with it. I also purchased a USB-CAT cable for the FT-857D so that I could independently check my construction or test some configurations. I was having major fun! I even worked a local ZS-land PSK competition and learned a lot about logging and QSL’s and stuff.
And then the trouble started. Sigh. I became convinced that the reason I wasn’t building a country list faster, was because either my home-built interface or my laptop was NOT GOOD ENOUGH … you know the story?
Step one: Replace the sound card. I purchased a small USB Sound Card dongle from the local computer shop. While it worked and I made a contact or two, nobody told me my signal was any better than before. I was very disappointed but of course I convinced myself that it was a cheap chinese product.
So the next step was to thrust my hand deep into my pocket and but a brand new SignaLink. I plugged it in and except for a small misunderstanding about functionality (the SignaLink is only a sound card, not a combined CAT interface) it worked well. But I was disappointed yet again – nobody gave me a better than before signal report. AFter spending all that money I can emphatically say the expensive brand-name interfaces perform no better than a proper home-built interface. The SignaLink is a nice device though, and the volume control knobs are cute to twist while fiddling.
But the job wasn’t done yet: I needed to be completely portable, and that implied QRP. Radio, and laptop. All battery operated. I already own the laptop – a very nice Lenovo X1 Carbon UltraBook. This is one of those Brand-New Super-Thin Ultra-Light laptops that runs for 8 hours on a recharge and weighs next-to-nothing. And I own a reasonable rig – the Yaesu FT-857D is not very light but can go down to 5 watt. I only needed an interface that uses ONE USB CABLE. I started to realise that my nice laptop had one shortcoming: It only has two USB ports. One is used by the mouse, and the second one MUST drive the sound card as well as the CAT interface. Since the SignaLink is sound only, I continue my quest.
Two devices jump out from the crowd: The DigiMaster Pro3 from G4ZLP (UK) and the RigBlaster Advantage from West Mountain Radio (USA). Both are very capable devices, both get good reports, and both are overseas (read=EXPENSIVE SHIPPING). Eventually I contacted both suppliers and to be honest I made the decision on price: Shipping from the USA was just a litte more expensive. I sent my credit card details to G4ZLP Electronics and lo and behold a few days later my shiny new apparatus arrived in the mail. It took me minutes to rip it out of the box, throw away the instructions, and start using it. I added 7 new countries in one evening before even looking at the instructions.
The DigiMaster Pro3 deserves a review on its own and I will do that in a follow-up post. However, I can say without a shadow of doubt that the sound quality (and thus the signal quality) is pretty much the same as any USB sound card. The real benefit for me, and the reason I love the DigiMaster, is that I can now use one USB port on my laptop to drive the radio’s CAT interface plus the Sound Card. It does that very well.
And yes, it is awesome to twiddle the sound knobs.
Wouxun KG-UV920PI must be more careful, Sam does it again! So I walk into Radio Accesories innocently, just wanting to say Hi to Sam and Bertrand and check up on things. For some reason the conversation drifts to the new special that he is running for the new hams that just passed their RAE exams – a Wouxun KG-UV920P VHF/UHF 50watt for a very good price.
Somewhere during the conversation Sam lets me hold the radio in my hands, and as you all know, one you have touched the goodies your hands are stuck with superglue and you can’t let go.
Eventually I walk away with the Wouxun KG-UV920P radio (the latest version I believe), a Surmen NR-770R dual-band antenna, a K412 lip-mount bracket, and a Surmen SC-ECH 5 meter RG58 body mount harness – the complete outfit. I opted for the better bracket because it allows 3D adjustment and the slightly better gain antenna because the cost difference wasn’t big, but if you are tight on the cost then you can buy the slightly cheaper versions – I’m sure Sam will be happy to supply.
Rushing home (it was after 5pm) I unpacked everything on the front seat of the car expecting a major installation effort. I was pleasantly surprised to find that all the screws, clips and tools were included. Installation took me the full amount of 20 minutes. All-in-all this is a very good combination with everything included – just add 12 volt and go! My first QSO was through a repeater and good signal reports followed effortlessly.
My subjective review of the radio is that it has a very good receiver. It feels like the receiver is super-hot, picking up signals and holding them when driving. I like it and can recommend this as a good buy for an amateur looking for a FM rig.