Category: My Equipment

  • My Footwarmer Works

    HLA 300 Plus
    HLA 300 Plus
    I don’t like linear amplifiers and I find my little Yaesu FT857D almost always puts out a hard, clean and clear signal that is good enough. I’ve never doubted the brave little radio would pull me through.

    Until Sunday. Earlier the day I worked the Unions End expedition organised by the Adventure Radio Club [click here fore more info] under the callsign ZS3ARC on 40m. It was busy but I didn’t have any trouble to exchange 59’s with Martin ZS1SM and so I was quite chuffed with myself, adding the very rare grid square KG05 to my slowly growing WAGS collection.

    Later that evening when the bands closed and they moved to 80m I thought it would be nice to make a second contact. More is better, right? So I called Martin. He was happily chatting away to some other contacts so the band must have been relatively open to him. Here and there he mentioned crashes or interferences but generally he was having good QSO’s.

    So I called Martin again. This time I checked my equipment casually just to make sure everything is plugged in and so on. Martin chatted on …

    The third time I called Martin he heard something through the noise but he couldn’t properly identify me and stuff, and we couldn’t complete the QSO. By now I realised that this logbook entry was going to take something a little extra, like a few extra WATTS.

    Earlier this year I bought a HLA 300 Plus amplifier made by RM Italy from Sams Radio. The price was right, my power supply wasn’t. On a good AHH! it pulls more than 40 Amps and trips my 30 Amp power supply. However at that stage it already bends the needle on my SWR meter past the 300 Watt mark. So the little project was paused, waiting for the arrival of some shekels to upgrade the power supply. And while I was waiting I was happily adding more countries to my logbook using the 50 or 100 Watts of the barefoot radio.

    But getting this grid square twice was very very important to me and so I decided to take a big risk. What if I kept my voice lower not to exceed the power limit? Very quickly I plugged the antenna across, the amplifier was already wired to the power supply. I went right down to 5 Watt on my Yaesu FT-857D, I switched the 3dB attenuator on the front panel of the HLA-300 in, tuned 10kHz lower in the band, and did a test call. Disaster! The power supply crumbled under the strain. I will not forget the disappointing click of the trip switch. Sigh. What now!

    My antenna is a 80m horizontal loop strung between the trees and it resonates slightly higher up in the band. I pulled out my MFJ-941E Antenna Tuner (also from Sams – thank you Sam!) and pulled the obviously too high SWR down to something a little bit better. By now I was panicking and my hands were shaking so I remember that my settings were not perfect. Next time Sam, please sell me the automatic tuner version! A last check that I’m not connecting the wrong coax cables, and I sit down for a final test. If this doesn’t work …

    Just over 30 Amps and 240 Watts and she holds! Lets go! Tune to 3.680 MHz, check my breathing, and wait for a gap. One call (with my eyeballs firmly locked on the ATU power meter) and Martin comes back! Yippee! He gives me a 57 because of QSB and noise but a very readable signal and we both confirm our entries in our logbooks! Crazy how happy I was with that contact confirmed!

    Logbook ZS3ARC 80m
    Logbook ZS3ARC 80m


    Did I learn something from this exercise? Yes: Never ever give up. And that my little amplifier – that most Hams scorn because it is not a kilowatter – has given me a rare contact. What more can a Ham ask for?

  • CTCSS Tones For Older Radios

    88.5Hz Tone Generator
    88.5Hz Tone Generator
    Jay my old Yaesu FT-480R is now operational on tone-protected repeaters! (Ed: Almost!)

    From my bad location deep in the pits of Sandton I can just reach the Sandton repeater (145.700) up on the water tower near Wm Nicol Drive if I look north, and if I look south I can definitely reach the ZS6TJ repeater (145.650) on the Carlton Centre. The latter is a very convenient repeater for me to use as it will put me in contact with most of the people I need to talk to from my home QTH. The only problem is they were forced to put a 88.5Hz CTCSS sub-tone on the repeater because otherwise it was prone to false triggering.

    And the problem is that my old FT-480R was built in the early 80’s, before the days of CTCSS. However Yaesu had the foresight to put a little connector at the back of the radio where a 35mV signal can be injected (in addition to a burst, but the two signals are paralleled) together with a convenient PTT signal marked 13.6volt. So the search was on for a CTCSS tone generator. I didn’t even bother to look for an original part as the radio is very old, although Yaesu makes mention of a FTS-63E device that should fit the radio.

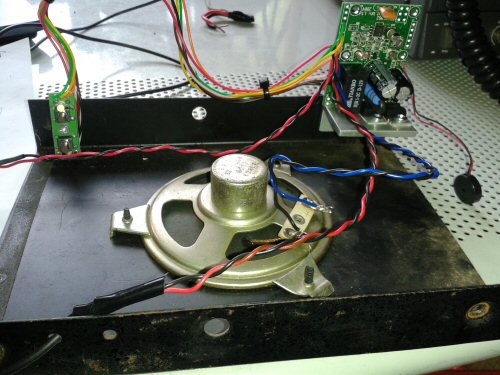
    It didn’t take me long to discover that OM Thys Maree ZS6MJM in Pretoria is building some excellent tone generator boards for the Magalies Club ZS6MRK. Very small and compact, it requires a 5-12v in and puts out a perfect tone that can be level-adjusted. On the bench it immediately gave me a beautiful tone, I adjusted the level and proceeded to install it in an open space in the radio cabinet. Fortunately the FT-480R has a bump on the bottom for the speaker, and there in the corner was a perfect hiding spot for the board.

    I haven’t been able to trigger the repeater yet because I soon discovered that the power to the board was not 13.6v as the diagram says, and I suspect a loose connection or something. Nevertheless, I can highly recommend this little board as an add-on to an older rig as it has all the ingredients of a “Life-Extender” for older radios.

  • Yaesu Interfaces

    Audio board
    Audio board
    OM Doug Defty ZS1DUG from the Cape asked me what software and hardware I use to interface my Yaesu FT-857D and this is the reply I sent him:

    Hello Doug, hows the Cape!

    Lets tackle the software first: I started using Ham Radio Deluxe as my main package this past weekend. The main reason is the handling of the logbook. I want to start collecting some awards, and it feels like HRD is going to do it for me. However I played with many packages before making a decision: fldigi, DXLab and a few others. To be honest, I’m keeping all of them on my laptop because each one does something special that I like. What I am saying is, my contest logbook is from now on going to be on HRD. The rest is for playing. DXLab had a very easy way to monitor HF beacons, which I loved. fldigi on the other hand was great to sort out my cables with and watch the waterfall display. There are other nice programs too, you should try them all and keep the one that works for you.

    The hardware followed an equally diverse route. I have two radios (FT-857D and FT-840) and thus I needed two setups. Eventually I realised it was over the top to build so many cables, but I like experimenting. Now, you need two cables per radio: 1= audio, 2=radio control.

    (1) The audio to and from the radio into your PC can easily become contaminated with RF and hum loops, therefore you need to isolate the signals with small audio transformers. I bought one board from Jaco ZS6PX and it was almost identical to the one I bought from Phillip ZS6PVT, Essentially it is a matchbox-sized device with two isolation transformers and a capacitor/resistor or two. The transformers we buy from Communica for a few rands, see my picture attached. This one also has a PTT circuit onboard, but of course the Yaesu can PTT through the CAT cable and I don’t use the PTT on my radio. Total cost for an audio interface is R50 or so if you build it yourself.

    (2) The radio-control cable (CAT in Yaesu language) is a little more complicated, although not terribly so. I am going to include a HRD manual for your perusal that I found on the internet and it has a few diagrams. You have to do level-shifting from 0-5volt to +/- 12volt. The hardest part is finding a board to simplify your construction. Basically there are 2 ways to interface: you either use a MAX232 chip, or you use a few transistors. I’ve tried both and they work. I even built the “tini-cat” circuit diagram that I found on the internet. Notice though the generous use of little ferrite rings everywhere to kill RF interference. The photo shows the board I purchased from Jaco ZS6PX (transistors) and Phillip ZS6PVT makes a chip one. Both work very well. Built-up they can cost you a little bit, but if you are handy with a soldering iron you can do it yourself. My first one I built for nothing, stripping an old CB radio for parts!

    RS232 board
    RS232 board

    NB NOTE: Just remember, the boards you build yourself are Serial (RS232) interfaces. Modern computers don’t have serial ports any more, so you should have an additional USB-to-Serial converter cable handy. This adds around R100 to your budget if you have to buy it.

    (3) While we are on the topic of expanding your radio, I want to mention that I also built an external S-Meter for my 857, the hardest part was to print the new scale to stick onto the existing dial.

    (4) My final add-on is a small board that I bought from Vivian ZS6VD. You plug it into your mic cable, and you use a PC Headset as a mic-and-headset combination. Quality very good and it took me an hour to build. Now I can operate silently at night while the family is asleep..

    Doug, I was ecstatic when I was first able to control my rig from my PC, and so I wish you luck with your project. Don’t hesitate to contact me for more info. I’m putting this email on my website also.

  • First PSK31 Contact in 2013

    Digital Test
    Digital Test
    Wow what an exciting weekend! Greatly inspired by Noel Hammond (ZR6DX) during his talk at the West Rand Amateur Radio Club, I put together a few items that have been gathering dust in my junkbox. Being late in the day I didn’t expect anybody to be around, so I sneaked a quick CQ on what I thought was an empty piece on the 20m band just to see if everything was working and if there is something going out on the wires.

    Well, you can imagine my excitement when ZR6AOC (David Cloete from just up the road in Weltevreden Park) replied. My hands were shaking, I didn’t have any macros loaded to assist me, and I didn’t even know how many watts or splattering I was emitting! But I couldn’t resist and I replied.

    To my horror David came back! He wasn’t joking! Its working! We had a nice if short QSO, he even gave me a good 599 report. I think I forgot to breathe. The result is that I am hooked on digital. As you can see from the photo the electronics wasn’t built into a case yet, but shortly afterwards they were all neatly tucked into a box and by the end of the weekend I made 10 contacts and 6 countries. Awesome stuff!

    BTW I’m setting up the Yaesu FT-840 permanently as a digital station so I don’t have to swop cables, and it is going out on a Broadgun Travelling Wave antenna (from Webb Industries, a multiband inverted Vee wire). All my contacts so far have been around 50 watts.

    Don’t hesitate to give me a call sometime, I would love to make contact with you!

  • Measurements Abound

    Major_MTD72
    Major_MTD72
    My radio and antenna collection is finally getting some rest, and my focus for this month has been power. Yes, getting enough 12 volts into all the boxes. My original Yaesu FP-707 Power Supply (the one that originally came with my FT-707) went Missing-In-Action (yup we live in South Africa) during the moves from my old house to my new house, and all I could find to use temporally was a FP-12 – a nice but slightly underpowered 12 Amp power supply.

    Now “underpowered” is an interesting statement, as I didn’t have any way to actually measure the current and voltage outputs of my power supplies. Initially, while I was fixing old radios and pulling wire antennas around, it didn’t really matter if I was slightly subjective about my power and a few amps here or there wasn’t enough to worry about. Even a standard hobby multi-meter (DMM) can read 10 Amps and that was good enough, initially.

    But gradually the need arose for more accurate measurements. Reading voltage was easy on the DMM, but reading up to 10 Amps for short bursts with the same DMM was just not good enough. So I shopped around and I came across the most useful little meter by the Major-Tech brand [click here] which reads out a digital 0-20 Amps with the relative ease of plugging in a fuse. Yup, as you can see from the picture it has a dongle the size of a screw driver handle with a nice digital read-out, connected to a measuring pad with a short wire. Now, this little beauty (an adapter for easy current measurement on blade type fuse connectors for cars) plugs into any blade-type fuse holder. Imagine that – I could actually see how much current I was pulling from my car battery without making any cuts or connections to the wiring AT ALL! All I did was find the cigarette lighter fuse, pull out the fuse and plug in this little monster – and there I had a direct, real time read-out of current.

    Major_MTD72
    Major_MTD72
    While it is a little pricey off the bat, this became less of an issue as its usefulness was soon expanded to do duty into other territories. Firstly, the adapter clips open to reveal a sense wire of about 3cm long. If you want to read higher ranges, just solder your sense wires a little bit closer to each other on this sense wire, and obviously re-calibrate (display is fixed at 0 – 20 whatevers). I’ve set mine now to read 0-40 Amps, but understand in my case I have to double the reading, so if I read 8 Amps I know it is 16 Amps.

    The second change is to solder two connecting wires to the two measuring spades (see first photo). I use heavy duty chocolate strip connectors for making temporary connections around the shack, and so now I can insert this baby in line with any power line for an extended period of time if I wish, making lots of measurements. A hobbyist’s dream tool!

    I bought mine from Mica but I’m sure any Major-Tech supplier can order one for you, or you can buy on-line. Enjooy!

  • Sounds Better

    bhi NEDSP1062-KBDa
    bhi NEDSP1062-KBDa
    Comparing my two rigs, I was under the impression that my older Yaesu FT-840 had much better sounding audio than the new Yaesu FT-857D. This is strange for me, and counter-intuitive, as I thought the newer radio would perform better. I also have to mention that I have a selecion of antennas to choose from, and one antenna might sound slightly better than the other.

    But the basic root-problem remained a high frequency noise on the audio, especially on 40m, that made it very unpleasant, difficult and tiring to listen to.

    I invested in a MFJ-784B Tunable DSP Filter to see if it made any difference. It was nice to play with and I will write more about it later, but sufficient to say it doesn’t get rid of my problem. It improved the average sound but the high frequency annoying fuzz was still there.

    So yesterday I bought a dhi DSP Amplified Module (NEDSP-1062 KBD) and rushed home, prepared to be dissappointed again. I rigged up a lid from an old CB radio and tagged and taped everything together to try it out before deciding on a more permanent installation (remember, it might not work). Well, 4 hours later and many delightful QSO’s in the log I can honestly say: “It works!”. You can believe everything they say on their websites, and all the audio clips they give are exactly as I experienced it on my bench.

    Essentially the kit I have (there are others too) sits in the speaker line. The 1062 is an amplified unit that takes speaker output, processes it and throws it at your new external speaker. It has multiple levels of processing and I found myself settling (after much playing) on number 5 (16dB tone reduction and 17dB white noise reduction), but I can imagine with other radios and speakers and setups the ability to easily choose more or less processing is going to be a big help.

    Certainly a must-have on the Yaesu FT-857D and one that I cannot operate without. I see they make a specific one that can be mounted inside the case of the FT-857 with the buttons easily accessible on the top. I like that. I might even sell this one and buy that one. The processor is identical, it is just the mounting thats going to be easier.

    Verdict? On a scale of 1 to 10, where 10 is the best, I will give it 11 because it has consistently surprised me.

  • My FT-840 is not resisting

    Yaesu FT-840
    Yaesu FT-840
    I am out on a limb here. Most of my friends use Kenwood or Icom radios but I love Yaesu radios, they talk to me (pun not intended)!

    It might have something to do with the fact that my first rig many years ago was a Yaesu FT-707 with tuner and PSU and everything and it served me well for many years. That is a story for another day. But back to the present: When I pulled my trusty 707 from the mothballs a few weeks ago the caps were obviously dry and the VFO danced a merry dance on the display, and fixing it was not going to be a quick-fix. So when I found that Charles King ZR5CTM had a secondhand Yaesu FT-840 he wanted to sell, the negotiations with the minister of finance started. What? she said – you already have so many radios (pointing to a broken 707). To cut a very long discussion short, I ended up making Charles an offer which was accepted and the parcel was posted to me.

    Disaster! The SA Post Office kept my precious parcel for 3 weeks, claiming there was a strike and that nobody was receiving any parcels. Yet on their track-and-trace, backed up by a phone call from the missorted post office branch, it clearly showed as having been sent to the wrong place twice. When I am calm again I will tell you that story of the strike that was not a strike.

    But back to the main story. Upon receiving my cargo it was obvious that it had seen a few hard bashes along the way and there was something loose on the inside. It powered on but didn’t transmit and a few other strange behaviours. Googling it pointed to a very common problem: There is a resistor R2213 near a voltage regulator that runs very hot and sometimes burns out. Well, I know Dion at LA Radio who fixes radios so off to the workshop we go. It seems that the ceramic part of the resistor can get brittle and in this case broke from the shaking around. It was a simple fix to attach a 10 ohm 10 watt resistor to the back of the chassis with two connecting wires, and voila! tha radio works like new. We chose not to drill any holes in the chassis because we didn’t want microscopic metal shavings to settle inside the radio. Have a look at our mod:

    R2213
    R2213

    The work we did is based on the article by John E DeBarr Jr aka November Alpha Eight Yankee [click here] but we had to use another component that is locally available. Instead of a 8.2 ohm or as some other websites say 9.1 ohm we only had a 10 ohm resistor available. It doesn’t seem to make any noticable difference. I took some pictures and can send you a PDF copy of my own work as we progressed but John’s article is quite clear with some very good instructions and pictures, for example this one shows the old resistor still in position (mine was broken):

    R2213 inside
    R2213 inside

    My 10 watt resistor hanging off the back of the radio gets very hot, so I can imagine what the original puny 3-watter must have felt like inside the radio. Definitely a recommended procedure to prevent further damage to the main PC Board.

  • On The Roof

    IMAG0194I picked up a nice sun tan on Saturday and it was unintentional.

    I just unpacked my radios after many years, I renewed my SARL membership, and I was ready to go! But … no antennas. So out of the house, survey the environment and check with the XYL about the limits of aesthetic encroachment she would tolerate. You will probably hear about this many times but I live in an old suburb, I’m surrounded by tall trees, I have an Eskom servitude on my back wall with tall power lines 40 meters away. Any signal will struggle to get in or out. Nevertheless, there is an old FM antenna bolted to the chimney and it is not being used any longer as we’re using a DSTV dish.

    In my excitement I forgot to watch the weather. It was a blistering hot day and on a freshly painted matt black tile roof Apollo the Sun-God did his best to cook me from both sides.

    Nevertheless, my faithful casual labourer Thulani stood it out with me and we pulled down the old TV antenna, extended the pole by 1m with a swimming pool pipe, and pulled up a wire antenna. This is temporary though and we will have to go back up again once Ra has depleted his wrath.

  • New Website

    Welcome to the new home of ZS6ALU, Leon Uys. I haven’t been on the air for a while. An acrimonious – read expensive – divorce took its toll. Hobbies took second and third place after my little one (you can read more about her here) for a long time, maybe 20 years. During that time I packed my radios away in bubble wrap, my desires became frosted memories, and I barely survived.

    The good news is that things are starting to stabilise on the home front. So, with some trepidation, I unpacked my FT-707 and cut a piece of wire for an antenna. On that same Saturday I got myself a suntan on the roof and a stretched muscle from tying cable ties. I claimed my corner of the world in the spare bedroom, next to the window, I wheeled in an old computer stand, laid down an extension cord for power, and checked for smoke. Hearing the crackle of static was euphoric.

    Eventually it is all coming together. This is posted in January 2013 and I will keep you updated as I start putting it all together.

    Watch this space for pictures and news.